
LED Sign Programming Guide
Getting started
Things are about
to get exciting now that your LED Sign is powered on.
Your next step is
scheduling your training session; we will help you navigate this new world. After
you schedule your session, you can get prepared by downloading and installing the
Sign software. Take a moment to familiarize yourself with the program and list any
questions you want us to address during your training.
Download: Your LED Sign Programming Software
The software for your sign is Viplex Express. Once your download is complete, open the Viplex Express (.exe) file and complete the installation.
Download Viplex Express- To connect your computer directly, connect the second LAN / Ethernet cable to the LAN port of the POE injector. And connect the next end to your computer's LAN / Ethernet Port.
- Open your control panel and select Network and Internet.
Connecting to the sign
You may have two CPE antennas, a Client, and Access Point, depending on your selections. Or you may have a single 4G modem. Below are the steps for connecting with the CPEs or optional 4G modem.
Connecting with the CPE Antennas.
The CPE antenna creates a local network that you can use to connect to your sign. There are two ways to connect your computer to the sign using the CPE antennas.
- Access Point Only. Using just the access point is possible if your office is close to the sign. The access point will create a local network. The local Network is called 'Signcity' out of the box, and the password is Signcity123.
- To use this method, connect the Access Point to your sign and wait for all lights on the side to be lit. Typically it takes about 2 minutes.
- Open your Wi-Fi settings and connect to the Signcity network (enter password above).
- After you connect, open the Viplex Express and move to the next step.
- Access Point and Client. Using the Client and the Access point together extends the Network and lets you connect over a further distance. When using the access point and Client together, you can connect wirelessly over Wi-Fi or directly with the provided LAN/Ethernet cables.
- Connecting wirelessly: Connect the Client to the antenna port on the sign.
- Use
the provided POE injector to connect the power
to the access point. To power the Access point,
plug the ethernet cable into the POE port on the
POE injection.
Wait for the access point to power on, and all the lights are lit. You can verify that you have a good connection by looking at the lights on the Client.
The first two lights, Power and Lan, should be constantly lit. You may notice that the LAN light intermittently flashes. The three lights above display the signal strength.
Three (3) lights indicate that you have an excellent connection to the access point. To maintain the best connection, position the Access point and Client within the line of sight of each device. - Connect the computer to the Signcity network, then proceed to the next step.
- Select Network and sharing center and then change adapter options.
- Right-click on your Ethernet Adapter and select properties
- Select IPV4 and select properties.
- Now, select 'Use the following IP address, then enter the following IP address: 10.1.10.127
- Click into the subnet mask field. And enter the 255.255.255.0
- Leave the remaining fields blank then, select Ok, and then close.
- An alternative option is to connect the LAN Port to your router. Some routers do not require any changes. In other cases, we must reconfigure the Access point and Client to match your network settings
- Finally, the Access Point can also be reconfigured as a repeater to extend your Network to the sign. To attempt this route, contact us to schedule your session. Charges may apply.
-
Still
unable to connect? If the settings above do not work, connect to the
sign's backup network to check the network configurations. To access this
network, you must be very close to the sign. And have a laptop with Viplex
Express installed.
1) Stand very close to the sign and search for the WIFI network called AP###### (AP followed by a series of numbers)
2) Connect to the network and enter the password 12345678
3) Open Viplex Express, select Async and select the terminal tab
4) Confirm that the player is listed and verify the activity status icon on the left.
5) Green means you are connected and logged in. Orange means you are connected but not logged in. If the icon is orange, click connect and enter username admin and password 123456.
6) Click the Control tab at the top and then select Network Configuration.
7) Modify the settings for Wired Network.
-Uncheck DHCP if checked
-Change the IP address to 10.1.10.128
-Enter the Subnet mask 255.255.255.0
The remaining fields can be left blank. Click done. Now refresh the settings by clicking device read to verify that the sign saved your new settings.
If you receive a prompt that the gateway or DNS is invalid, enter the following values:
-Gateway: 10.1.10.254
-DNS: 8.8.8.8
Once complete, resume set up using your chosen connection method above and move to the next step.


Connecting to the sign using the optional 4G antenna
If you selected the optional 4G modem, connect the modem to the antenna port on the sign. Wait for the modem to power on. Then search for the wireless network 'Signcity' and enter password Signcity123. Once connected, open Viplex Express and proceed to the next step.
Initial setup of Viplex Express
When you launch
Viplex Express for the first time, you have two choices, Studio Mode and Async Mode.
Studio refers to a live connection where your screens play advertisements directly
from an external source such as your computer. Studio mode is an optional upgrade.
If you did not purchase this addon, select Async mode.
Async Mode is an
offline connection where you upload content to the sign's local storage using your
PC or mobile device.
The device will be listed on the terminal table
when you connect to the Signcity or AP
network.

The image below shows the possible device status.

Once the player
is listed, it may log in automatically. If successful, the player will show a green
icon to indicate that the player is online.
Sometimes, you see an orange
icon next to the player. The orange icon means you connected to the player but have
not logged in. If this happens, click the connect and enter the username, admin, and
password: 123456.
Once you log in, take note of your screen size. Then click
the Solutions tab.

Click new
Solution, then select regular screen.

Name your
Solution and then enter your screen size; Width and Height and click OK.
You can import
your images and videos on the next page or create new text files. You can also add
other elements, such as time and weather.
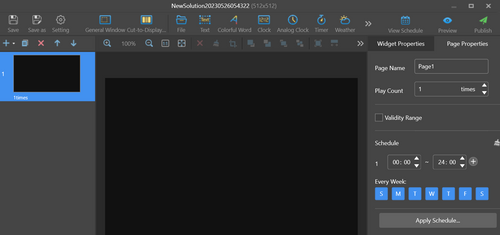
Once completed,
click publish to upload your Solution to the sign.

Now that you
have the basics, you can experiment with the various elements. Publish your
creations to see how it looks on your sign. And if you still need to.