


How to Assemble and Install Your LED Sign
When your LED sign arrives, it will be securely packed in a crate. Inside the crate, you will find several pre-assembled sections. These sections will have a maximum dimension of 4 feet by 4 feet for ease of handling and installation. Below is a step-by-step guide to assembling and installing your LED sign.
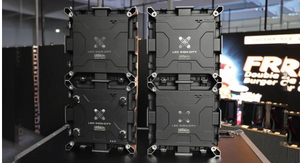
Step 1: Unpacking the Sign
-
Carefully open the crate and remove the pre-assembled sections.
-
Ensure that all parts, including bolts, brackets, L brackets, power cables, and data cables, are included in the package.
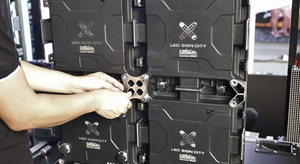
Step 2: Assembling the Sections
Each section is designed to fit together seamlessly using bolts and brackets. The assembly process varies based on the size of your sign.

For a 4 ft by 8 ft sign:
-
You will receive two sections that are 4 feet by 4 feet each.
-
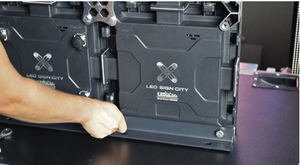
Place the two sections together and align them properly.
-
Secure the sections together using 2 bolts per foot of height:
-
Since the sign is 4 feet tall, you will need 8 bolts in total.
-
-
Attach the brackets:
-
-
A bracket is installed every 2 feet starting at 2 feet.
-
For an 8-foot-wide sign, install 3 brackets along the back.
-
Each bracket requires 4 bolts to secure it in place.
-
Once the bolts and brackets are in place, the sign will form a solid cabinet structure.
Step 3: Installing the L Brackets
-
Install the L brackets around the edges of the sign.
-
Lift the sign and position it onto your supporting structure.
-
Secure the L brackets by bolting them to the structure.
Step 4: Connecting Power and Data Cables
-
Connect the power cable to the designated power source.
-
Link the sections together using the data cable.
-
If your sign is double-sided, repeat the assembly and connection process for the second side.
Step 5: Assembling Signs Taller Than 4 Feet
For signs taller than 4 feet, the sections are broken down further. For example:
For a 5 ft by 8 ft sign:
-
The sign will arrive in four sections:
-
Two 3-foot-tall sections for the bottom
-
Two 2-foot-tall sections for the top
-
-
Follow these steps for assembly:
-
Connect the 3-foot sections at the bottom using 6 bolts.
-
Secure with 2 brackets.
-
Stack the 2-foot sections on top and connect them using 4 additional bolts.
-
Install a single bracket between the top and bottom sections.
-
Secure the sections across the width:
-
Use 2 bolts per foot across the top.
-
For an 8-foot-wide sign, install 16 bolts.
-
-
Attach approximately 15 additional brackets for rigidity.
-
Step 6: Final Installation
-
Once the sections are secured, install the L brackets around the edges.
-
Lift the sign and hang it onto your supporting structure.
-
Secure the L brackets by bolting them into place.
-
Ensure all power and data cables are properly connected.
Estimated Assembly Time
-
Small double-sided signs (two sections per side):
-
First side: ~30 minutes
-
Second side: ~15-20 minutes
-
-
Larger signs (5 ft by 8 ft, four sections per side):
-
First side: ~45 minutes
-
Second side: ~30-35 minutes
-
Need Assistance?
If you have any questions during installation, feel free to contact us: 📞 Phone: 866-343-4011
📧 Email: quotes@ledsciencecity.com
We’re here to help make your installation process as smooth as possible!