Novastar TB2: How to Connect and Use the HDMI Port
Table of Contents
- Step 1: Connect the HDMI Device
- Step 2: Log into the Player
- Step 3: Verify Connection Status
- Step 4: Access Terminal Control
- Step 5: Set the Video Source
- Step 6: Configure the Display Settings
- Step 7: Adjust the Output Position (Optional)
- Step 8: Finalize and Display Content
- Support
Connecting an HDMI device to your Novastar TB2 allows you to display external content directly on your LED screen, providing flexibility for various applications. Whether you're integrating a media player, computer, or camera, this guide will walk you through the simple steps to set up and configure your HDMI input, ensuring your content is displayed exactly how you want it.
Step 1: Connect the HDMI Device
- Connect your HDMI device (e.g., a media player, computer, or camera) to the HDMI port on the Novastar TB2.
- Ensure that your TB2 is powered on and connected to the screen.
Step 2: Log into the Player
- Connect to your TB2 either via Wi-Fi or Ethernet.
- Open the ViPlex software on your computer or mobile device.
- Log in to your player using the appropriate credentials.
Step 3: Verify Connection Status

- In ViPlex, go to the Terminal Page.
-
Check the connection status:
- Gray: Connected before but currently offline.
- Orange: Connected but not logged in.
- Green: Connected and logged in, ready to use.
Step 4: Access Terminal Control

- Once connected, navigate to Terminal Control within ViPlex.
- Go to the Video Source section.
Step 5: Set the Video Source

- In the Video Source section, you’ll see the resolution of the internal source, typically set to 1920x1080P.

-
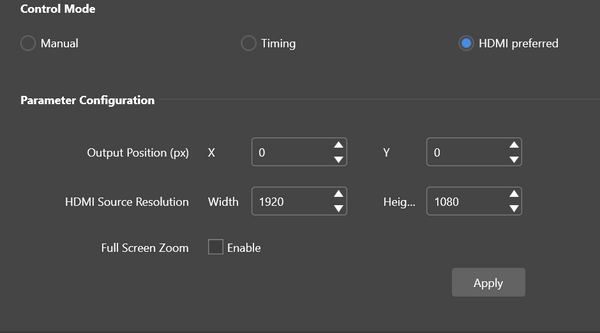
Choose your control mode:
- Manual Timing: Select this if you want to manually switch between the internal source and HDMI.
- Timing: Set a schedule for when the screen should switch between the internal source and HDMI.
- HDMI Preferred: This option makes the screen default to HDMI when an HDMI input is detected.
Step 6: Configure the Display Settings

- Under Parameter Configuration, ensure the X and Y axes are set to 0 if you want the content to start at the top left of the screen.
- Ensure the HDMI resolution matches your internal source resolution (preferably 1920x1080).
- Enable Full Screen if you want the entire screen to mirror the HDMI content.
Step 7: Adjust the Output Position (Optional)

- If your content does not fill the screen or you want to display a specific portion, adjust the Output Position:
- X Value: Set this to the number of pixels from the left where you want the content to start.
- Y Value: Set this to the number of pixels from the top where you want the content to start.
Step 8: Finalize and Display Content
- Once all settings are configured, click Apply to confirm your settings.
- The content should now be displayed on your screen according to the specified configuration.
Support
If you encounter any issues or have questions, please reach out to us at LED Sign City via email at support@ledsigncity.com or call 866-343-4011.


